
Setting up Resend + verifying your sending domain (a complete walkthrough)
The piece every solo founder hits when they wire up transactional email. Add a domain, prove you own it, send your first email — about 15 minutes start to finish.
Setting up transactional email is one of those side-quests that sounds simple until you're 45 minutes in trying to figure out why DKIM isn't verifying. This walkthrough is the version I wish I'd had when I set up Resend for Groundbase.
About 15 minutes if you have access to your DNS settings. Longer if DNS propagation drags. The good news: once it's done, it's done — you don't have to think about it again until you switch sending domains.
Why Resend (briefly)
There are a lot of transactional email providers — Postmark, SendGrid, Amazon SES, Mailgun, others. Resend is what I picked because:
- Developer-first API. Clean, modern, the kind of API where you read the docs once and never have to come back.
- Free tier is real. 100 emails/day and 3,000/month with no credit card required, on one verified domain. Enough to run a small product through MVP.
- React Email integration. First-class support for React Email components if you want to template your emails in JSX.
- Deliverability is good. Not Postmark-tier elite, but solidly above SendGrid, and improving.
If you're already using Postmark or SES and it's working, you don't need to switch. But if you're picking one fresh, Resend is the modern choice for indie SaaS in 2026.
What we're building toward
Mental model first: when you send an email from a domain you don't own, mailbox providers (Gmail, Outlook, etc.) treat it as suspicious and route it to spam. To prove you own the domain — and therefore that your emails are legitimate — you add three DNS records:
- SPF (Sender Policy Framework): "These IP addresses are allowed to send mail for my domain."
- DKIM (DomainKeys Identified Mail): A cryptographic signature mailbox providers verify against a public key in your DNS.
- DMARC (Domain-based Message Authentication, Reporting, and Conformance): "Here's what to do if SPF or DKIM fails."
These three records together prove to Gmail/Outlook/Apple Mail that the email is really from you. Without them, your emails land in spam or get rejected outright.
Resend automates most of this — it generates the records you need; you copy them into your DNS provider; Resend verifies them; you're done.
Prereqs
- A domain you own (e.g.,
yourdomain.com) - Access to your DNS settings (typically Cloudflare, Namecheap, GoDaddy, or wherever your domain's nameservers point)
- About 15 minutes
A note on registrar vs. DNS host: the company you BOUGHT the domain from (registrar) and the company that HOSTS your DNS records can be different. For example, I bought groundbasecrm.com on Namecheap but delegated DNS to Cloudflare. The screenshots in this guide are from Cloudflare's DNS panel; the same TXT/CNAME records work identically on any DNS host — only the "add a record" UI differs.
Step 1 — Sign up for Resend
Head to resend.com and create an account. Free tier doesn't require a credit card. You'll land in an empty dashboard once you're in.
Step 2 — Add your sending domain
This is where Resend generates the DNS records you'll need. Click Domains in the side panel, then Add Domain in the top right. A small dialog opens asking for the domain name (e.g., yourdomain.com) and optionally a region. Submit it.
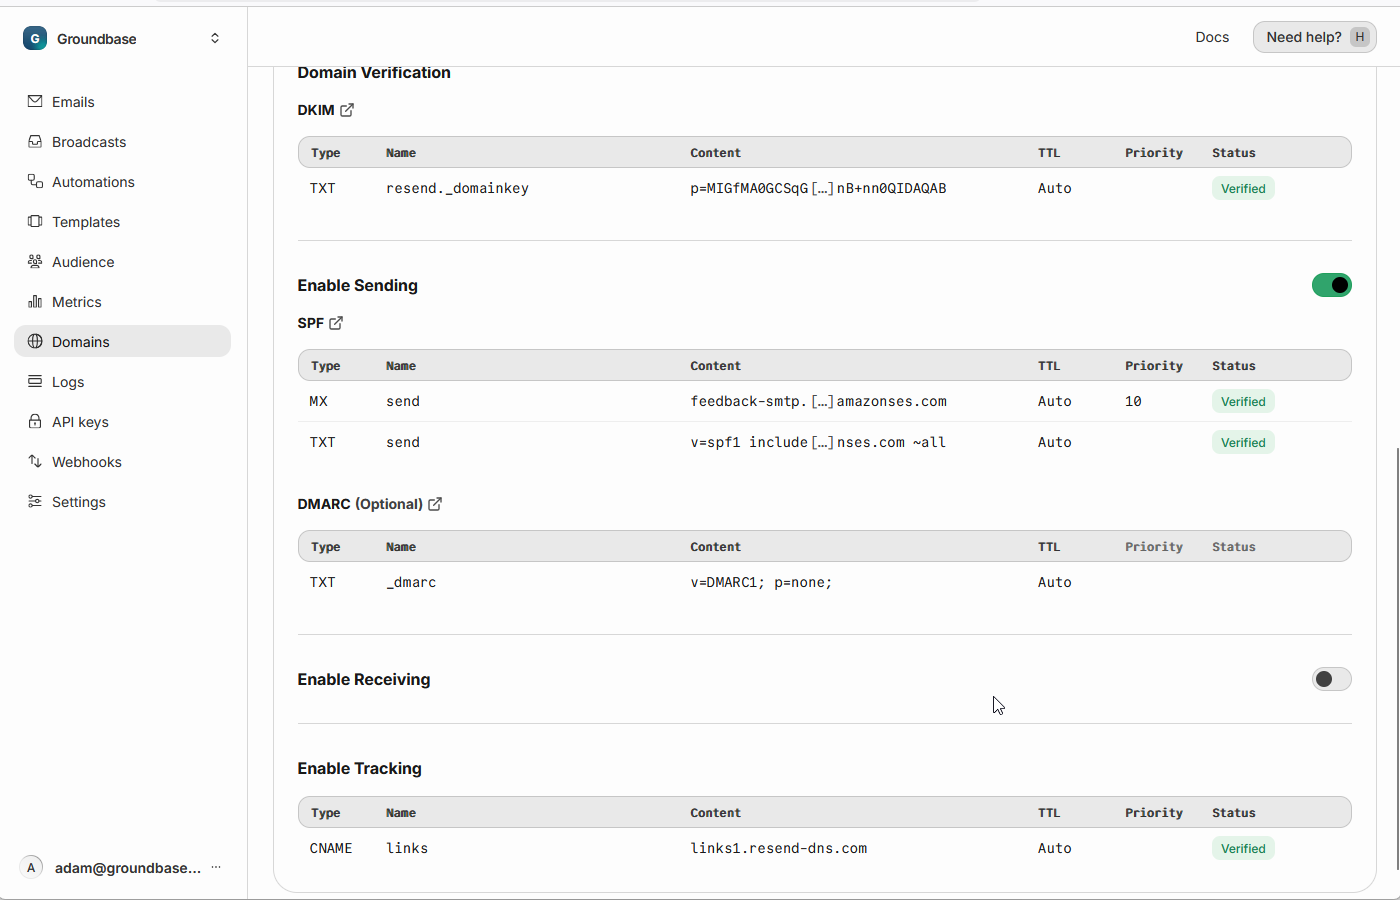
After submitting, Resend shows you the DNS records to add. Keep this page open — you'll be copying values from here in the next step.
Understanding what you're about to copy
Before you start copying records, here's what each one does so the "what am I even doing" feeling goes away:
- TXT record at
send.yourdomain.com(or similar) — Resend's verification token, proves you control the domain - MX record at
send.yourdomain.com— Routes bounce/reply mail correctly for the subdomain Resend sends from - TXT record for SPF — Authorizes Resend's servers to send from your domain
- CNAME records for DKIM (usually 2-3 of them, with names like
resend._domainkey) — Points DKIM lookups to Resend's published public keys, proving signed emails are legitimate - TXT record for DMARC (optional but recommended) — Tells mailbox providers what to do with unauthenticated mail
All of these are public-by-design. They're meant to be visible in DNS so any mail server worldwide can verify your emails.
Step 3 — Add the DNS records in your DNS provider
This part is mechanical: copy each record from Resend, paste it into your DNS host. The exact UI varies — Cloudflare, Namecheap, GoDaddy, Route 53, etc. all look different — but every modern DNS provider has the same flow: Add Record → pick the type (TXT, CNAME, or MX) → paste the name and content from Resend → save.
Repeat for each record Resend gave you (typically 3-5 records: a couple of TXT for SPF/DMARC, a CNAME or two for DKIM, sometimes an MX for bounce handling).
Once added, the records appear in your DNS host's records list alongside everything else you have set up. Here's what mine looks like in Cloudflare DNS — the Resend records are mixed in with my other records (Cloudflare Email Routing, Google verification, Workers, etc.):
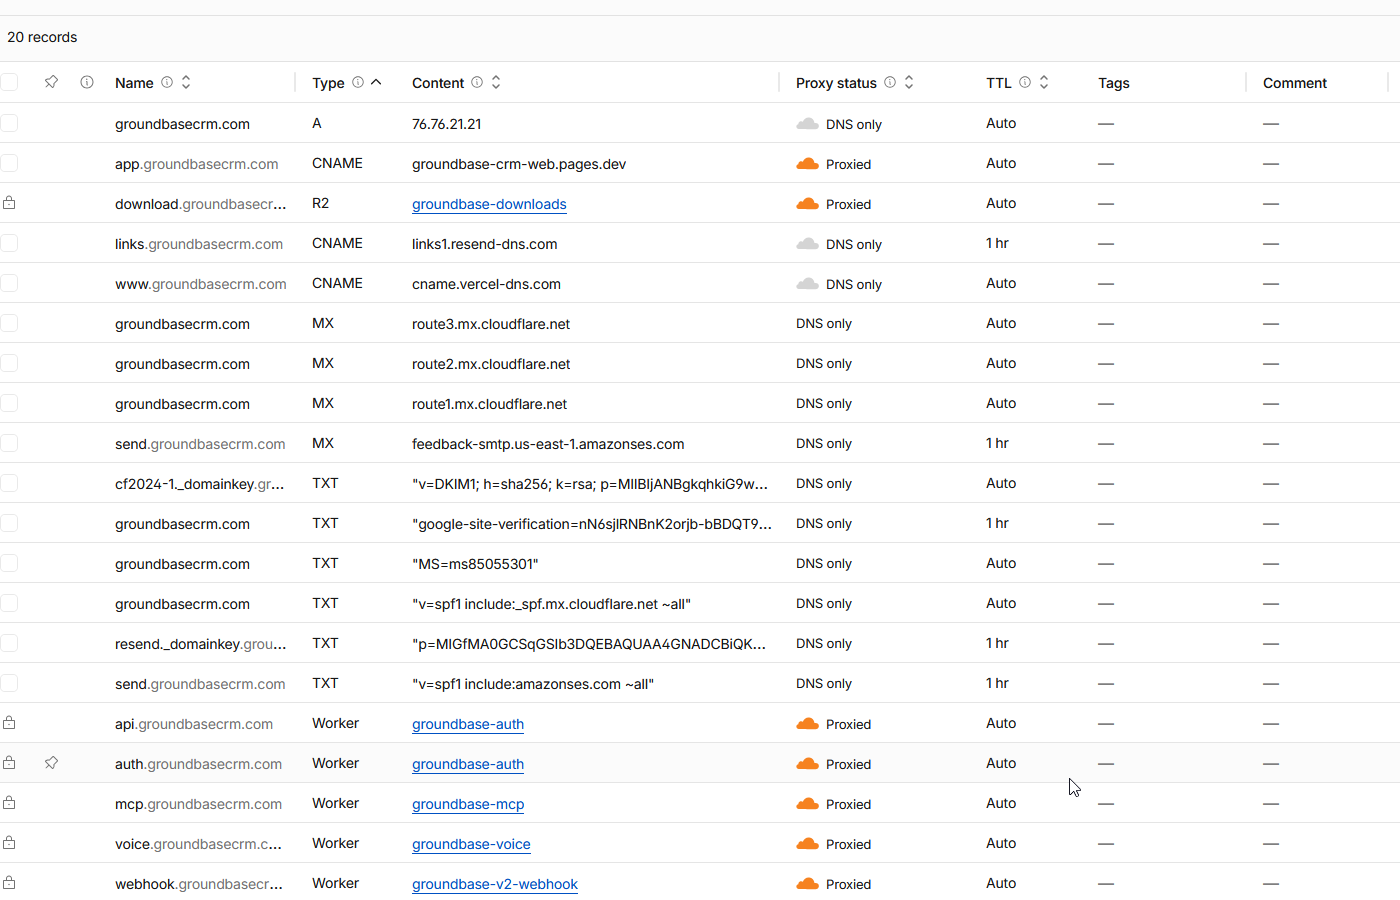
In the screenshot above, the 4 Resend records are:
links.groundbasecrm.com(CNAME →links1.resend-dns.com) — click trackingsend.groundbasecrm.com(MX →feedback-smtp.us-east-1.amazonses.com) — bounce handlingresend._domainkey.groundbasecrm.com(TXT) — DKIM signing keysend.groundbasecrm.com(TXT →v=spf1 include:amazonses.com ~all) — SPF authorization
(Under the hood, Resend runs on Amazon SES infrastructure — that's why several of the records reference amazonses.com. Don't be alarmed when you see it; that's the normal Resend setup. You're sending through Resend's API, but the underlying mail servers are SES.)
Your DNS list will look similar — the Resend records will be 3-5 entries among whatever else is on your domain. Don't worry if the rest of your records look different from mine; the only ones that matter for email sending are the Resend ones.
Important about TTL: leave it on auto / default. Don't set a high TTL — if you ever need to change these records later, low TTL means changes propagate faster.
Important if you're on Cloudflare: make sure these records are DNS only (gray cloud icon), NOT proxied (orange cloud). Cloudflare's proxy doesn't pass through TXT/CNAME content to DNS resolvers the way mail servers need. This bites a lot of people — easy to miss because Cloudflare defaults new records to proxied for record types it CAN proxy. Toggle to DNS-only manually.
Step 4 — Verify in Resend
Once the records are in your DNS, head back to Resend. Click into your domain (either from the Domains list or its detail page). The verification status shows in green next to the domain name — Verified once everything checks out. If it's still Pending or Not Started, look for a Verify button on the same page to trigger a manual check.
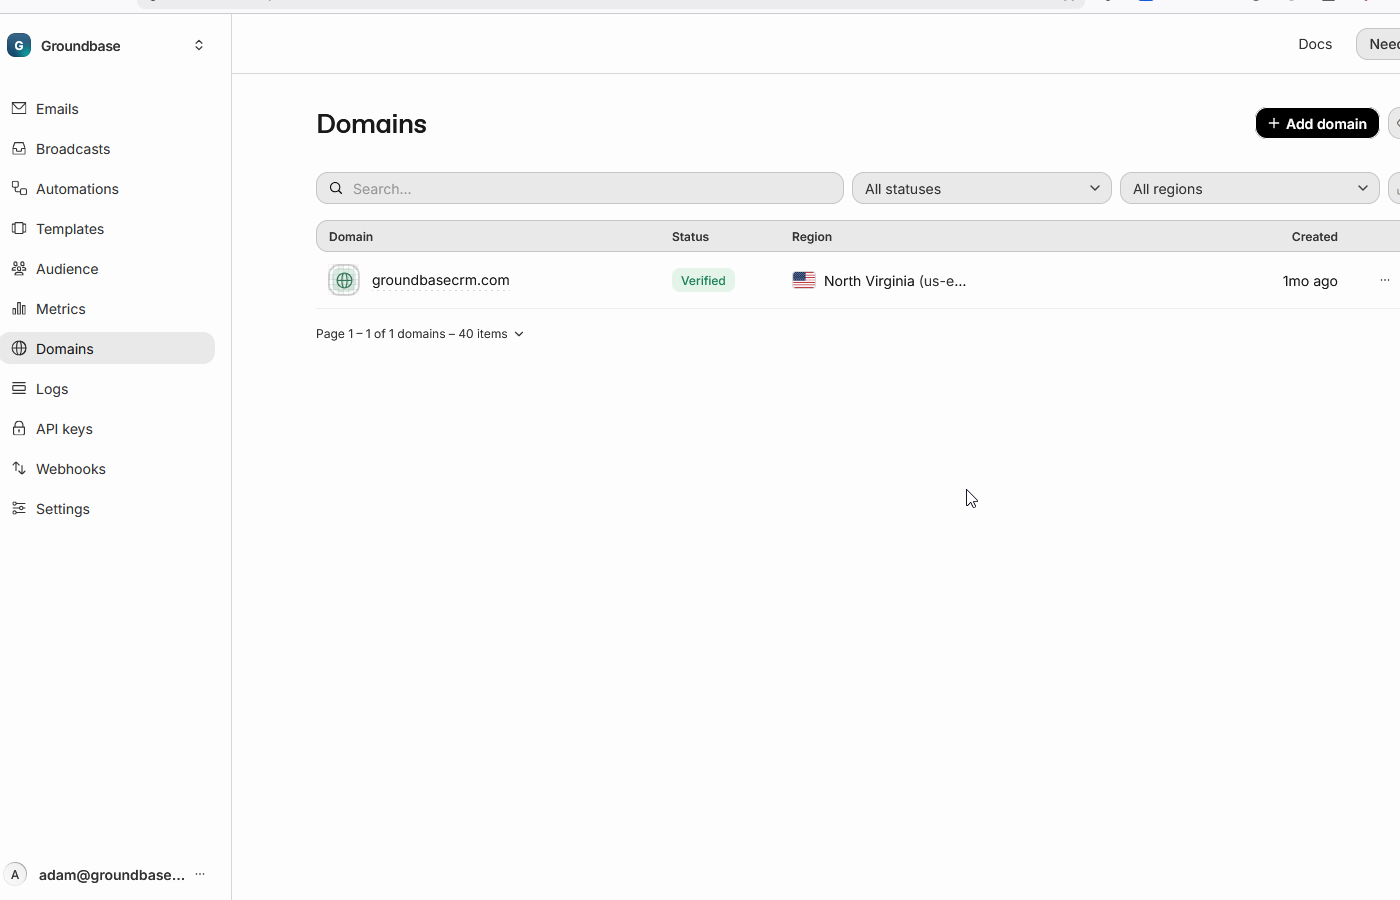
If verification fails the first time, that's normal — DNS propagation can take a few minutes to a few hours depending on TTL. Wait 5-10 minutes and try again. If it still fails after a few attempts, jump to the troubleshooting section below.
Step 5 — Create your sending API key
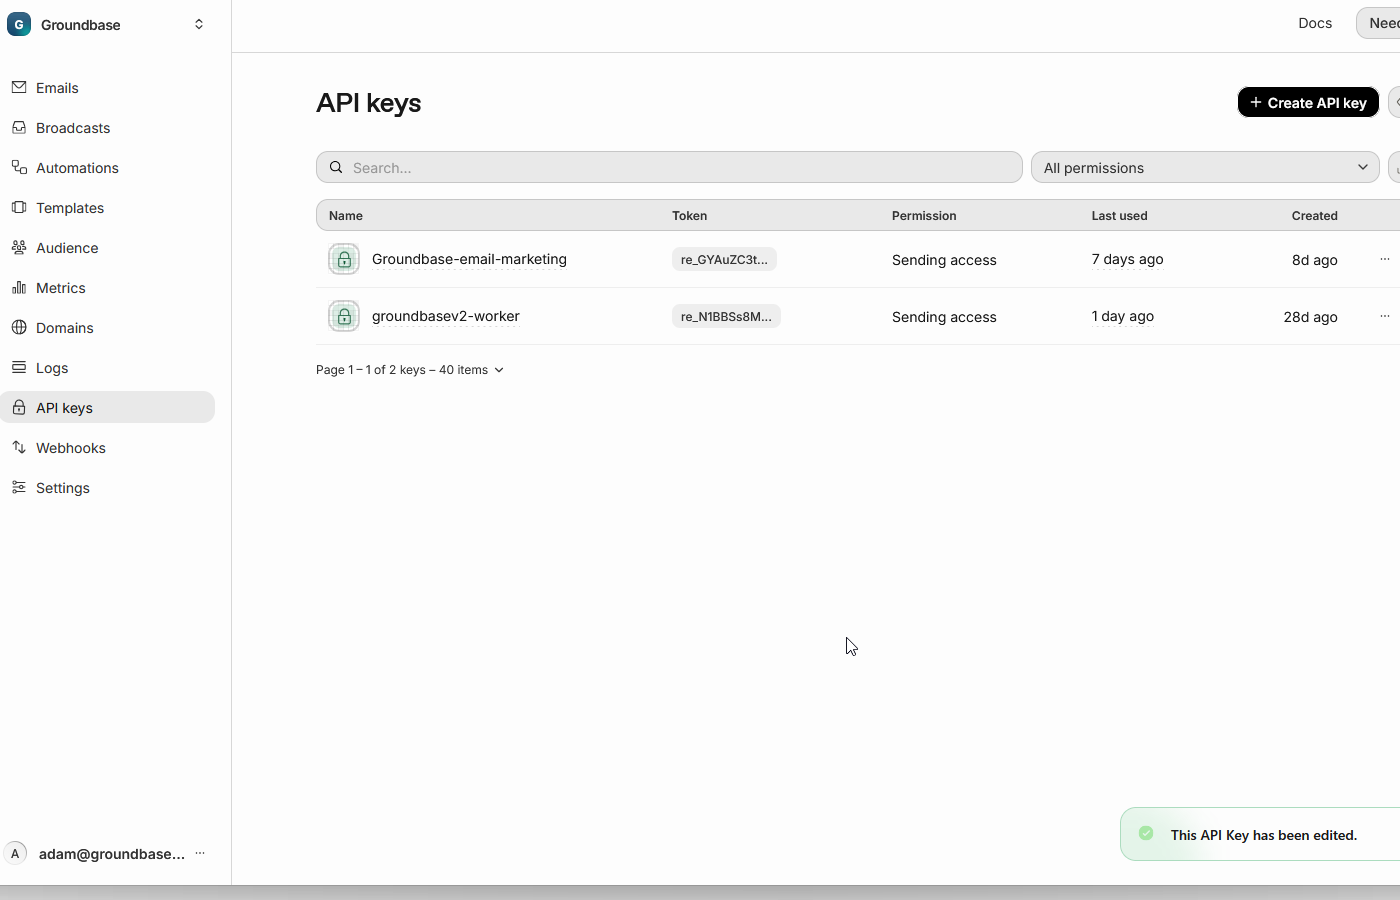
Now you need an API key your code will use to call Resend's API. Click API Keys in the side panel. You'll see a list of any existing keys (empty if you just signed up). Click Create API Key in the top right.
In the dialog, give the key a descriptive name (e.g., myapp-worker or myapp-marketing — having multiple named keys is useful later for hygiene). Pick Sending access unless you specifically need a higher permission. Submit.
The full key value is shown ONCE on the screen that appears next — copy it immediately and stash it in your password manager. Once you close that screen, Resend only shows a truncated preview (re_xxxx...). If you lose the value, you have to delete the key and create a new one.
Step 6 — Use the API key in your app
In your code, you reference Resend via an environment variable (NEVER hard-code the API key — that's a security issue).
For a Cloudflare Workers project (like Groundbase or the GroundStack starter kit):
npx wrangler secret put RESEND_API_KEY
# paste the re_... value when prompted
For a Next.js app or generic Node project:
# .env.local (DO NOT commit this file)
RESEND_API_KEY=re_xxxxxxxxxxxx
EMAIL_FROM="Your App <hello@yourdomain.com>"
Then in your code:
import { Resend } from "resend";

const resend = new Resend(process.env.RESEND_API_KEY);

await resend.emails.send({
  from: process.env.EMAIL_FROM,
  to:   "user@example.com",
  subject: "Welcome",
  html: "<p>Hi there.</p>",
});
The from address needs to be at the domain you just verified — hello@yourdomain.com, noreply@yourdomain.com, support@yourdomain.com, etc. The prefix doesn't have to be a real mailbox you can receive at, BUT if you want replies to actually reach you, set up Cloudflare Email Routing (free) to forward hello@yourdomain.com to your real Gmail.
Troubleshooting
"Domain not verified" after waiting an hour. Re-check the DNS records you added against what Resend shows. The most common cause is a typo when copying — a single missing character in a DKIM CNAME breaks verification entirely. Compare side-by-side, character by character.
Emails send but land in spam. Three usual causes: (1) Your domain has no reputation yet — send slowly for the first few weeks so it builds up. (2) Your email content looks spammy — too many links, ALL CAPS, words like "FREE!!!" Test with Mail-tester.com which scores your content. (3) You skipped the DMARC record. Add it.
Sent to your own email at the workspace owner — recipient blocked. Resend's free tier (without a verified domain) only lets you send to the email address registered to your Resend account. Once you've verified a domain (the whole point of this guide), this limit lifts and you can send to anyone.
Replies go nowhere.
You set the from address to hello@yourdomain.com but never set up an inbox to receive at that address. Add Cloudflare Email Routing (free) to forward to your real inbox.
DKIM verified yesterday, not verified today. Cloudflare proxy toggled on, possibly during an unrelated change. Re-verify the CNAMEs are gray cloud (DNS only), not orange (proxied).
You're done
Once verification is green, you can send emails from your domain through Resend's API. The setup work is one-time. Welcome to transactional email that mostly just works.
If you're using this guide as part of getting Groundbase set up: drop your RESEND_API_KEY and EMAIL_FROM into the relevant settings, and the auth + billing emails route through your verified domain automatically.
If SMS is the other half of your setup, the companion piece is A2P 10DLC registration for solo operators — same shape of one-time paperwork, different provider.
Questions about this one? Email me directly: blog-resend@groundbasecrm.com — I read every one.
Built by a solo dev. Try it.
Start your 14-day trial →More from the Pipeline
Bill your hours without retyping them
Track time with a timer or log it after the fact, let the hourly rate remember itself, and put the unbilled…
Set up a booking link that keeps your Google Calendar free
A step-by-step setup for a Groundbase booking link that only offers the times you actually want to give awa…
Free offline CRMs for Windows (2026): what's out there and what each one needs
Most "free CRMs" are a website with a free plan, a user limit and a contact cap. If you want one that runs …
Quotes with a deposit: price the job before you invoice it
A quote in Groundbase is a priced offer the customer accepts online, optionally by paying a deposit through…